It Lives!

Submitted by jbreland on Sun, 08/15/2010 - 19:33

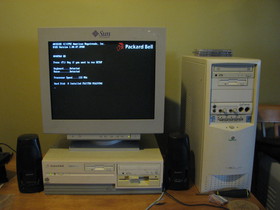
My first[1] computer was a Packard Bell Legend 418CD, which my parents bought for me toward the end of my freshman year of high school (1995). I'd always been somewhat interested in and fascinated by computers, but it wasn't until my freshman year that I began to take a strong interest in them (mostly because one of my friends in high school, Aaron Mielke (man, I hope spelled that right) was into computers himself, but unlike me actually knew what he was doing and taught me a great deal about how they work). My Packard Bell, despite the company's general reputation for cheap/poor quality, was a fantastic system that served me well for many years. When purchased, it had the following specs:

My Packard Bell
My Packard Bell (underneath the monitor)
The Gateway (right) supplanted it in 1999
  • 75 MHz Pentium CPU
  • 8 MB FPM DRAM (or maybe 4 MB - this was upgraded quite a bit and I forget the original amount)
  • 1 GB hard drive
  • 1 MB integrated Cirrus Logic GD5430 PCI video card
  • Some funky combo SoundBlaster 16-compatible sound card and 14.4 Kbps modem
  • Two (yes, two!) 2x CD-ROM drives
  • One ubiquitous 3.5" floppy disk drive
  • 14" XGA (1024x768) monitor with some pretty fly bolt-on speakers

This was a pretty pimpin' system back in 1995. It came with Windows for Workgroups 3.11 and MS-DOS 6.2, and although Windows 95 had been released a couple months earlier, I was perfectly happy with 3.11 as I really didn't like the new interface in 95 at the time (in fact, I didn't upgrade to 95 until 1998, and even then only because Final Fantasy VII PC required it, and I really wanted to play Final Fantasy VII). Retrospectively, I'm still glad it came with 3.11 because it gave me the opportunity to learn a lot about DOS and pre-95 versions of Windows that I otherwise would've missed out on.

I was really into gaming at the time, and was able to play any game I wanted on it at the time and, after some upgrades, for years to come (the last major games I can remember playing on it were Half-life and Final Fantasy VII, which were certainly not lightweight games). It served as my primary (and only) computer until the summer of 1999, when it was replaced by my Gateway P500 (Pentium III 500). By that time, my Packard Bell had been upgraded numerous times to include:

  • 133 MHz Pentium CPU
  • 40 MB FPM DRAM
  • 2 GB hard drive
  • 16 MB Creative Labs 3D Blaster Banshee PCI video card (3dfx Voodoo Banshee)
  • Creative Labs SoundBlaster AWE 64
  • 56 Kbps modem
  • Kingston KNE20BT 10 Mbps ISA NIC
  • 8x CD-ROM drive

I pretty much upgraded it as far as I possibly could, short of replacing the motherboard. After it was displaced by my Gateway in 1999, it still served a number of functions in the following years:

  1. Home computer for my parents/sister for a couple years
  2. Test box for experimenting with Linux
  3. Router/firewall for my home network, running Linux and OpenBSD at different times

This box stayed on router/firewall firewall duty all the way until 2005 or 2006, when I replaced it with a Linksys WRT54G. Getting eleven years of productive use out of a computer is an awesome accomplishment, and I was actually rather sad when I shut the thing down for good a few years ago. I simply had no other use for it at the time, so into the closet it went.

Well, fast-forward to a couple weeks ago when I pulled it out along with a couple other old computers I'd acquired to scavenge for some parts for a project I was working on. Of the three computers, my Packard Bell was by far the best maintained, still in the best shape, and the only one that was still fully functional. When I powered it on it even booted up to OpenBSD, still ready for firewall duty after all these years. :-)

I was actually so proud of it, after I finished the particular project I was working on I decided to fully revive it once more as a DOS/Win 3.11 test/play box. Granted, it serves no real useful purpose, but at fifteen years old it's still doing everything I ask of it. The most recent set of changes and upgrades included:

  • back to the integrated 1 MB PCI video card - I stupidly gave my Banshee away to an ex-girlfriend long ago
  • The 8x CD-ROM drive was dead, and the original 2x drive, while it still worked, could not read CD-RW discs, so I swapped it out for a 24x4x4 cd burner (which was the oldest/slowest drive I had that would read CD-RW discs)
  • 3com 3c905c 100 Mbps PCI NIC
  • 5.25" floppy disk drive - used to copy data off of some really old floppies I still had from elementary school
  • I replaced the system fan with a brand new one - the original had developed a nasty vibration

At this point, the box is up and running better than ever. I've had a good time fixing it up again, and given the history involved I thought I'd share this experience with my readers. Hope you enjoyed.

Also, I have another, related retrolicious post coming soon, so keep an eye out for it.

  • [1] Technically this is not the first computer we had in my home, but rather my first computer, and the first computer I had that I knew what to do with. Prior to this, we had a Commodore 64, but this was just a game machine to my brother and myself, and I was far too young (~4) to know what else could be done with it anyway. Sometime after that my parents purchased what I believe to be a 386-based PC when I was around eight, but no one in my family knew how to use it for anything more than running WordPerfect Jr., and even that required consulting a set of instructions every time we used it.

No, This Site Is Not Malicious

Submitted by jbreland on Mon, 08/09/2010 - 20:53

Sorry to even have to post this, but apparently my site has been classified as "malicious" by certain parties. It all seems to have originated from this particular malware list:
http://www.malwareurl.com/listing.php?domain=legroom.net

The reason? Someone apparently doesn't like my download script for Universal Extractor. Seriously. This is the "malicious" URL:
http://www.legroom.net/scripts/download.php?file=uniextract16

Any guesses as to what that does? It lets you download Universal Extractor 1.6. Oh, the horror! I use the download script rather than link directly because I need to move the location of the actual installer file from time to time due to bandwidth concerns or other issues. By using the download script to serve up the file, I can easily point it to a new location at any given, implement load balancing if needed, etc., without anyone having to worry about dead links (well, except for people who insist on hotlinking directly to the file against my wishes, but I don't have much sympathy for them).

Apparently someone didn't like my script and reported it. I guess. I haven't been able to get any more information about the issue. I guess I can kind of, sort of, maybe understand the concern about a download script like this, as I guess it could, possible, maybe be hijacked in some way to serve up malicious content, but that's not what happened here. My script is written such a way that it'd be impractical to try to use it for malicious means (I won't say impossible because, quite frankly, anything is possible on the internet); it'll serve up the specified file from a specified URL on a specified remote server and nothing else. If anyone tried to fiddle with it by adding fake filenames, etc., it'll just return an "invalid file" error message.

So someone must've thought the script seemed somehow suspicious, but couldn't bother to do even the simplest of tests to verify it before reporting it to a malware site, and the malware site, of course, listed it without question. And even better, I just discovered that numerous other sites have lowered legroom.net's reputation as well because of this listing, because, naturally, none of them could be bothered to verify the claim either.

And finally, the icing on the cake is that this was originally listed on malwareurl.com on 12/15/2009. That's right, eight months ago. In eight months of being reported, listed, copied and listed, copied again, etc., not once was I ever notified of the dangerous, horrible malicious content on my website. It wasn't until today that a visitor noticed the problem and sent me an e-mail to give me a heads up (coincidentally, two people contacted me today - my heartfelt thanks to both of you). So, it took eight months to find out about a non-existent problem that denied access to or drove away who knows how many people from my website. Fantastic.

Some choice words are coming to mind right now, but I'll refrain because this is a (mostly) family-friendly site.

I get the need for these kinds of sites (I use a few myself for e-mail blacklists), and I can appreciate that many of them are volunteer efforts with limited time and resources. Nevertheless, I think it's reasonable to expect the site operators to:
1. attempt to verify reported content
2. notify the administrative or technical contact of the domain when the site is blacklisted

These steps are not difficult: a simple click wouldn't verified that my script was innocuous, and the notification process could be automated by simply querying whois and sending a standard form letter. If either of those had been done, this issue could've been resolved quickly and easily. Instead, I find out eight months later and I'm pissed. This is not the best way to build support for, or trust in, community-driven security projects.

OK, I'm finished my rant now. On a more positive note, I'd like to thank the operator at malwaredomains.com for a very quick and amicable response to my inquiry about removing the inappropriate listing. Hopefully I can get the source of the problem, malwareurl.com, to correct the problem soon as well.

Display Colored Output in Shell Scripts

Submitted by jbreland on Fri, 06/18/2010 - 04:10

Most modern terminals* (xterm, Linux desktop environment terminals, Linux console, etc.) support ANSI escape sequences for providing colorized output. While I'm not a fan of flash for flash's sake, a little splash of color here and there in the right places can greatly enhance script output.

In Bash, I include the following functions in any script where I want colored output:

# Display colorized information output
function cinfo() {
	COLOR='\033[01;33m'	# bold yellow
	RESET='\033[00;00m'	# normal white
	MESSAGE=${@:-"${RESET}Error: No message passed"}
	echo -e "${COLOR}${MESSAGE}${RESET}"
}
 
# Display colorized warning output
function cwarn() {
	COLOR='\033[01;31m'	# bold red
	RESET='\033[00;00m'	# normal white
	MESSAGE=${@:-"${RESET}Error: No message passed"}
	echo -e "${COLOR}${MESSAGE}${RESET}"
}

This allows me to easily output yellow (cinfo) or red (cwarn) text with a single line in a script. Eg.:

cwarn "Error: operation failed"

If this message was output normally with echo and it was surrounded by a lot of other text, it might be overlooked by the user. By making it red, however, it's significantly more likely to stand out from any surrounding, "normal" output.

My most common use for these functions are simple status output messages. Eg., if I have a script or function that's going to do five different things and display output for each of those tasks, I'd like to have any easy way to visually distinguish each of the steps, as well as easily determine which step the script is on. So, I'll do something like this (from one of my system maintenance scripts):

# Rebuild packages with broken dependencies
cinfo "\nChecking for broken reverse dependencies\n"
revdep-rebuild -i -- -av
# Rebuild packages with new use flags
cinfo "\nChecking for updated ebuild with new USE flags\n"
emerge -DNav world

For more details, the Advanced Bash Scripting guide provides a detailed discussion on using ANSI escape sequences in scripts, both for color and other purposes. You can also find some additional info in the Bash Prompt HOWTO, as well as useful color charts on the Wikipedia page.

*Note: Traditional (read: old) Unixes generally don't support useful modern conveniences like this. If you regularly work with AIX or Solaris and the like, you may want to skip this tip.

Spam Problems (actually, anti-spam problems)

Submitted by jbreland on Sun, 06/06/2010 - 10:55

I've been having issues with my spam module since upgrading to Drupal 6 a while back. It changed behavior very significantly, and in my opinion for the worse. Part of the problem I've been having with it is that content detected as spam is not always reliably reported as such. Sometimes it just disappears, literally. Submitters have the option to submit feedback on posts falsely classified as spam, and I may see that (if I remember to look in a completely different location than the rest of the posts I review), but even when I do see the feedback, the original post itself seems to be purged from the database.

I've noticed this problem before, but I didn't realize how bad it was. I have over a dozen feedback messages I just noticed for false positives, and I cannot approve the original posts because they no longer exist. Beyond that, there's no telling how many posts without feedback were falsely rejected.

The one good(?) thing is that this only seems to affect anonymous comments (which are heavily moderated anyway). If you want to post any comments to my website or forum, please register an account first - this should make sure your post gets through, and even if it is falsely reported as spam I should at least be able to review and approve it.

To everyone else that's been affected by this - my apologies. I do still have the content of the posts you submitted feedback on (as opposed to the original posts that I can simply approve as "not spam"), so I'll try to manually post them to the appropriate locations as myself and respond where appropriate. Please check back over the next day to see if your post made it.

I'm also going to investigate alternative anti-spam options to try to prevent this issue in the future. I'll write a new post about any changes.

Update:  Whew, ended up adding adding quite a few new forum posts and comments. Again, if you've posted a comment that was (falsely) flagged as spam and wondered why it never showed up, please check to see if your post is available now. I apologize once again for the screw up. Hopefully I can find a better spam solution soon.

Create Floppy Disk Images from within Linux

Submitted by jbreland on Sat, 06/05/2010 - 20:49

It's possible to create floppy disk images (IMG files) from withing Linux using native Linux utilities. Although you most likely won't have a very frequent need for this these days, one place where it can come in handy is when dealing with virtual machines. Emulators such as VirtualBox and VMware Player can mount virtual floppy images and present them to guest machines as physical disks, just as they can mount CD-ROM ISO images and present them as physical CDs.

Now again, there probably isn't a very widespread need to do this, but in my case I needed to be able to create floppy disk images for my Windows installation CD. I use a heavily customized installation CD with an answer file to automate Windows installation. Unfortunately, Windows XP is only capable of reading answer files from the CD itself (which doesn't work for me because I need to be able to change the file) or from a floppy disk. Newer versions of Windows, I believe, can read from USB drives, but as I only (and infrequently) run Windows inside a virtual machine, I don't have any great need to upgrade. Being able to easily generate floppy disk images containing updated answer files, etc. has been a huge help compared to keeping up with physical floppy disks, especially since my current desktop no longer supports a floppy drive. Now, I just point VirtualBox to the appropriate IMG files, and when I boot Windows (or the Windows installer) it'll see it as a normal floppy drive. Very handy.

In order to create floppy disk images, you'll need a copy of dosfstools installed. It should be available in most package repositories. Once installed, the following command does all the magic:

mkfs.vfat -C "floppy.img" 1440

You now have an empty, but valid, floppy disk image. In order to copy files to the image, you need to mount the image using the loop device:

sudo mount -o loop,uid=$UID -t vfat floppy.img /mnt/floppy

Note that the mount command must either be run as root or using sudo; the uid argument makes the mount point owned by the current user rather so that you have permission to copy files into it.

After you're finished copying files, unmount the image and you're done. You can now attach it to your emulator of choice as a floppy disk image. W00t.

To make things even easier, the following script automates the entire process; just pass it the directory containing all of the files you want copied to the floppy disk and it'll do the rest.

#!/bin/bash
 
# Setup environment
FORMAT=$(which mkfs.vfat 2>/dev/null)
MOUNT=$(which mount 2>/dev/null)
TMP='/tmp'
shopt -s dotglob
 
# Verify binaries exist
MISSING=''
[ ! -e "$FORMAT" ] && MISSING+='mkfs.vfat, '
[ ! -e "$MOUNT" ] && MISSING+='mount, '
if [ -n "$MISSING" ]; then
   echo "Error: cannot find the following binaries: ${MISSING%%, }"
   exit
fi
 
# Verify arguments
if [ ! -d "$1" ]; then
   echo "Error: You must specify a directory containing the floppy disk files"
   exit
else
   DISK=$(basename "${1}")
   IMG="${TMP}/${DISK}.img"
   TEMP="${TMP}/temp_${DISK}"
fi
 
# Load loopback module if necessary
if [ ! -e /dev/loop0 ]; then
   sudo modprobe loop
   sleep 1
fi
 
# Create disk image
${FORMAT} -C "${IMG}" 1440
mkdir "${TEMP}"
sudo $MOUNT -o loop,uid=$UID -t vfat "${IMG}" "${TEMP}"
cp -f "${DISK}"/* "${TEMP}"/
sudo umount "${TEMP}"
rmdir "${TEMP}"
mv "${IMG}" .

Universal Extractor 1.6.1 Released

Submitted by jbreland on Wed, 05/12/2010 - 03:15

After a nearly two year hiatus, I finally got around to updating Universal Extractor. This release focuses heavily on bug fixes, reliability improvements, and component updates, so the "new features" list is rather short. It is, however, an important update and I recommend all Universal Extractor users upgrade when they get the chance. It also includes several new and updated translations. Please check out the changelog for all the details.

For more information:
Universal Extractor home page and downloads
Universal Extractor ChangeLog
Universal Extractor feedback and support

Quick Domain Name / IP Address / MX Record Lookup Functions

Submitted by jbreland on Fri, 05/07/2010 - 16:06

Today's tip is once again focused on Bash functions (I have a whole bunch to share; they're just too useful :-) ). These are three quick and easy functions for performing DNS lookups:

ns - perform standard resolution of hostnames or IP addresses using nslookup; only resolved names/addresses are shown in the results

mx - perform MX record lookup to determine mail servers (and priority) for a particular domain

mxip - perform MX record lookup, but return mail server IP addresses instead of host names

Here are the functions:

# Domain and MX record lookups
#   $1 = hostname, domain name, or IP address
function ns() {
    nslookup $1 | tail -n +4 | sed -e 's/^Address:[[:space:]]\+//;t;' -e 's/^.*name = \(.*\)\.$/\1/;t;d;'
}
function mx() {
    nslookup -type=mx $1 | grep 'exchanger' | sed 's/^.* exchanger = //'
}
function mxip() {
    nslookup -type=mx $1 | grep 'exchanger' | awk '{ print $NF }' | nslookup 2>/dev/null | grep -A1 '^Name:' | sed 's/^Address:[[:space:]]\+//;t;d;'
}

And finally, some examples:

$ ns mail.legroom.net # forward lookup
64.182.149.164
$ ns 64.182.149.164   # reverse lookup
mail.legroom.net
$ ns www.legroom.net  # cname example
legroom.net
64.182.149.164
$ mx legroom.net      # mx lookup
10 mail.legroom.net.
$ mxip legroom.net    # mx->ip lookup
64.182.149.164

Bash Random Password Generator

Submitted by jbreland on Thu, 05/06/2010 - 17:50

Random password generators are certainly nothing new, but they, of course, come in handy from time to time. Here's a quick and easy Bash function to do the job:

# Generate a random password
#  $1 = number of characters; defaults to 32
#  $2 = include special characters; 1 = yes, 0 = no; defaults to 1
function randpass() {
  [ "$2" == "0" ] && CHAR="[:alnum:]" || CHAR="[:graph:]"
    cat /dev/urandom | tr -cd "$CHAR" | head -c ${1:-32}
    echo
}

I use this a good bit myself; it can be as strong (or weak) as you need, and only uses core Linux/UNIX commands, so it should work anywhere. Here are a few examples to demonstrate the flags:

$ randpass
UEJ1#QgdFbiJDvCiG*WbQoM:yM'y*[5d
$ randpass 10
4y8jsp#}&(
$ randpass 20 0
RT3Q3SJEgvnQDgz616RJ