Skip to: Download/Screenshots | Installation and Usage | Technical Details
Introduction
AutoFLAC Feedback
If you have any questions about, or find any problems with, AutoFLAC, please post your comments to the AutoFLAC topic on the Hydrogenaudio Forums. This has become the main point of discussion for this project.
AutoFLAC is a script that works in conjunction with Exact Audio Copy to automate the process of backing and restoring your audio CD collection using the FLAC media format. By default, AutoFLAC operates in rip mode, in which it automates the process of backing up a CD to individual FLAC files or a FLAC image. When used in write mode, AutoFLAC will automatically convert the CD back to standard WAVE files and write them to a CD-R using the associated CUE sheet. This CUE sheet allows an exact duplicate to be created in the event the original CD is lost, stolen, or damaged.
AutoFLAC was written with the free, powerful, and open source AutoIt scripting language.
Download Current Version: 1.2, Released: 10/16/2006
AutoFLAC Installer ( KB) - This is the recommended download. The installer will automatically install the application and optionally integrate with the Windows Explorer context menu. This package does not contain source code.
AutoFLAC Binary Archive ( KB) - This archive contains the binaries. Download this if you don't want to use the installer.
AutoFLAC Source Code ( KB) - This archive only contains the source code, but it includes all support files as well (compiler scripts, installer, etc.). This is best to download (along with the binary archive) if you want to help further development of AutoFLAC.
ChangeLog, ToDo - AutoFLAC development details
Installation and Usage
Note: Please read through the entire ReadMe file included with AutoFLAC before running AutoFLAC for the first time. EAC must be configured properly to work with AutoFLAC.
To install AutoFLAC, download the installer and run it on your system. You will have several options during installation:
FLAC binaries- installs flac.exe and metaflac.exe along with AutoFLACAdd AutoFLAC binaries to your system path- allows you to run AutoFLAC (and any flac/metaflac if included) from the command line-
Enable Explorer context menu integration for CUE sheets- addsWrite with AutoFLAC...option to right-click menu for .cue files
For manual installation with the binary archive, simply extract the files to your EAC installation directory (usually C:\Program Files\Exact Audio Copy\). To make starting AutoFLAC easier, you may want to create shortcuts to AutoFLAC in your Start Menu. To do so, simply drag AutoFLAC.exe to your Start Menu and drop it in the folder you'd like. You can also create a shortcut to call AutoFLAC in write mode by editing the shortcuts properties (right-click on the shortcut and click Properties) and adding " /write" to the end of the Target line (no quotes).
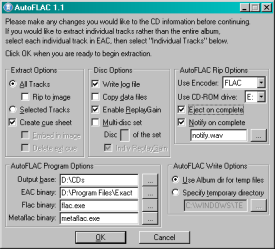
After EAC has been configured to work with AutoFLAC (see instructions in the ReadMe file), AutoFLAC can be run in rip mode by simply double-clicking AutoFLAC.exe. This will automatically start EAC and display the AutoFLAC GUI. Verify that the CD information is correct, set your AutoFLAC preferences, then click OK to begin ripping. AutoFLAC will notify you when extraction is complete.
You can run AutoFLAC in write mode in one of two methods: drag-and-drop and CUE file on AutoFLAC.exe, or run pass the /write argument to AutoFLAC.exe. If you use the first method, AutoFLAC will automatically begin the conversion and writing process. If you choose the second method, AutoFLAC will prompt you to select the CUE file that you'd like to write. If you choose the second method, you may also specify the CUE file to burn. For example:
AutoFLAC.exe /write "D:\CDs\Progressive Rock\Dream Theater\Octavarium\00-Octavarium.cue"
Usage and configuration details are detailed much more thoroughly in the included ReadMe file.
Technical Details
AutoFLAC is a script that can be used to automate audio CD ripping and CUE sheet generation using EAC, as well as provide additional functionality that EAC does not support itself. This additional functionality is described in below.
FLAC CUE sheet support
While EAC can be configured to rip directly to FLAC files using it's Command Line Encoder option, it does not natively support the FLAC format. This means that other EAC capabilities, such as creating a CUE sheet, writing a CD-R, etc. cannot support FLAC files. AutoFLAC enables transparent support for FLAC in these additional processes by converting the CUE sheet and FLAC files on the backend as needed.
FLAC write support
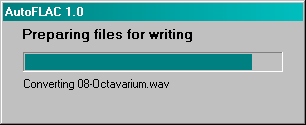
The single greatest feature of EAC for me is it's ability to generate CUE sheets from an audio CD and reuse these CUE sheets to create a perfect duplicate of the CD of the original is ever lost, stolen, or damaged. However, EAC only supports WAVE files when writing a CD, which means previously compressed tracks must first be converted to WAVE files. AutoFLAC automates this process by decompressing all tracks, converting the CUE sheet to reference WAVE files rather than FLACs, and loading the CUE sheet in EAC's cd-writing interface. After writing is complete, AutoFLAC will remove all temporary files.
ReplayGain support
AutoFLAC can use metaflac to calculate and store the track and album ReplayGain values for each CD ripped. This information can be used by ReplayGain-compatible media players to provide a constant "loudness" during playback.
Multi-disc support
Rather than ripping discs that are part of a single set to separate album directories, AutoFLAC can automatically renumber and retag discs so that they are saved to the same album directory. If enabled in the AutoFLAC GUI, the disc track numbers will be renumbered Nxx, where N is the disc number and xx is the track number. So, track three on disc two of a two-disc set will be numbered as track 203.
Data file support
AutoFLAC can check for the presence of a "data" track on an audio CD. These are usually found on "Enhanced CDs", and contain bonus material that can be viewed on a computer. If enabled, AutoFLAC will copy all data files to a Data subdirectory of the album after the ripping process is complete.
Naming convention
This isn't a feature, but merely an explanation of the naming convention utilized by AutoFLAC. All tracks will be ripped to an album directory in the following format: Base\Genre\Artist\Album\. The Base directory is set in the AutoFLAC GUI, and must match the equivalent option in EAC (see the ReadMe file for details). All tracks will be ripped to this directory in the format XX-Track Title.flac, where XX is the track number. "Meta" tracks, such as the CUE sheet and log file, will be have 00- prepended to the filename.
Various Artist discs follow the same naming convention, but are saved differently due to the lack of a single artist. VA discs are ripped to: Base\Genre\Various Artists\Album\, where Various Artists is a literal string. The tracks are ripped in the format XX-Artist Name - Track Title.flac.
Note: As of version 1.2, AutoFLAC supports variable naming schemes. This description has been left here for archival purposes.
Individual FLAC Tracks vs. Single FLAC Image
As previously described, AutoFLAC rips audio tracks to individual tracks. Some people may prefer to rip the CD to a single FLAC "image", and even embed the CUE sheet within the image. This can make management easier as now there is only a single file to manage for each ripped CD. I prefer to use the individual track method, however, because I want to be able to easily access each individual track in any media player I choose. Additionally, using individual tracks makes it easy to write a script to convert the FLACs to another format if needed, such as MP3s for a hardware digital audio player. As a result, AutoFLAC only supports ripping to individual tracks.
Note: As of version 1.1, AutoFLAC supports both individual tracks and single images. This description has been left here for archival purposes.


